Playing with PlayDate
When I was told “hey, are you interested in a low-resolution 1-bit game console?”, I didn’t have to think a lot. Have a guess. No clues given.
The PlayDate is a handheld video game console with some fun selling points for itself: it has a monochrome LCD screen, it has a crank and it’s cute! It a “punchy” setup: a ~180Mz Cortex M7 CPU (a CPU of the ARM series), 16MB of user RAM and 4GB of flash memory for storage. I could haved compared it with my Ti-Nspire in terms of performance if not for the difference in CPU generations and probably the RAM speed. I expect the graphic routines to be more optimized than what we had on Casio calculators.
Display-wise, the glorious 1-bit color depth is associated with what looks like a relatively dense 400x240 pixel resolution (the same screen resolution than a Nintendo 3DS’s top screen1), so it has enough pixels to let you play with dithering while not making it too distracting.

A screen resolution comparison between one of my monochrome graph calculators, Pico-8's resolution and the PlayDate. See how much space I'm getting!
Honestly? I was sold by the pitch. Well, it doesn’t let me program on the fly and it lacks at least one or two buttons to perfectly fulfill my tastes, but the idea of going back on B&W? Well, let’s say it got me by the strong nostalgia factor. The call of dithering is still pretty strong…
So, while I was waiting for my unit to get delivered, I got the news that the SDK was freely available and decided to have a first look at it, to see how it was shaped and would shape its games.
Note : I started writing this blog post in March, we’re in November and I’m still waiting for it, eh.
TL;DR.
If you want to skip the post and check the projects, you can find the pre-built binaries here and the source code here for the tunnel effect and there for the sphere’s source.
Disclaimer
When I was writing most of this post, the SDK version was 1.9.1. The installation procress or the SDK’s content may have changed over time, so if you come from the future, take the post with a pinch of salt, maybe Panic will have implemented improved functions.
The installation process
Because the console itself is based on a Cortex-M7 CPU (see the instruction set here), you’ll first need to install an ARM C/C++ compiler. The SDK suggests you to grab an installation of GCC for ARM, the link should point towards installers for Windows or other distributions, but your OS’ package distribution can work too. I suspect that clang could work but I haven’t tested it yet.
Then, the SDK’s installation process will either ask you either to set your environment variables to record its installation folder’s root or offer you to set them itself for your convenience. An emulator/simulator is even provided with the SDK for you to test without having a device yet, neat!
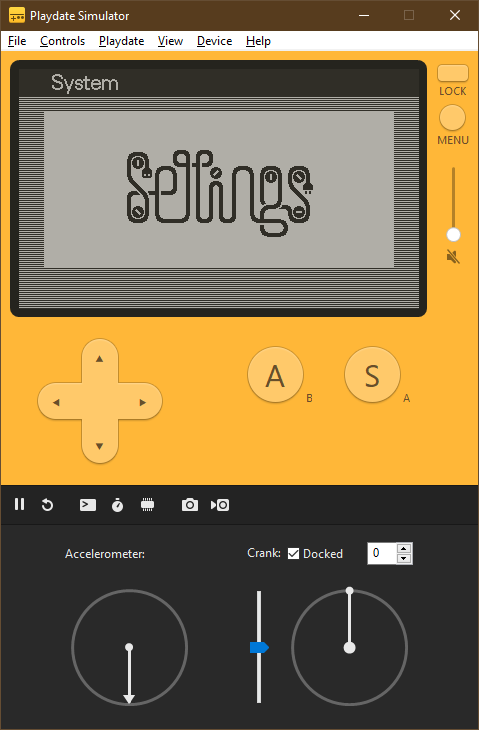
Here's the simulator. Wave it hello!
Creating a test project and testing it
Thankfully, there’s a small set of example projects for both Lua and C projects. To create a new project, you can just copy/paste one of the samples and start from it.
Here’s what I found out (or not) by experimenting through the process:
- The SDK offers a few ways to compile your project and I got the best results with CMake on both Windows and Archlinux. On Windows, creating a Visual Studio solution will work well. On the Arch side, generating GNU Make files was enough to get started without a hitch.
- The
Sourcefolder (notsrc) is the location to place assets, music, spritesheets, etc‥, which will be converted and packaged alongside the executable. Note that the compilation process will put the binaries inside the Source folder for the project packer to include them into the resulting<project name>.pdxfolder, so if you intend to use a version control software like Git, you might want to add exclusion rules for those files. - I haven’t figured out if VSCode’s CMake extension will properly support post-build steps yet.
- On Windows, don’t forget to shut down the simulator or to exit your program after debugging it. The Simulator opens the executable in an exclusive read/write mode and blocks the compiler from properly doing the post-build steps. The resulting error doesn’t really explain that yet, I had to guess that one.
After a further look and a few experiments, I noted a few small things about the SDK.
- Sprites are made of two bitplanes: the alpha mask and the color. It’s fun to see the same technique I have seen for years on calculators being in the wild again2. Usually, with MonochromeLib or on Axe Parser, we usually use the mask layer with an AND operation to erase the pixels before applying the sprite’s color data with an OR operation. Note that unlike calculators, a pixel represented by a bit set a 1 will be white and black if its bit is 0. I embolded this sentence because this change bit me in the back more than once and I often tripped on the difference.
- I didn’t expect to have a single object to point at the subsystem interfaces. I would have expected something like Steamworks SDK where you’d get an instance of the interface per subsystem instead.
- A few graphics routines are available on the Lua API but not in the C API. Too bad, I would have loved to goof around with the Mode 7-ish plane rendering routine built-in in the Lua API from C code.
With Visual Studio
The integration into Visual Studio works well with the simulator. It’s perfectly possible to hook into the Simulator and debug the binary. The callstack will be a little lengthy because you’re jumping into the simulator’s whole context, but so far I could debug on it as I would on a standard program, just compile, debug and breakpoint away!
On Visual Studio solutions, here’s a small tip. The build step to convert assets and package the binary is a post-build process and is only done after the project was built. The tip to to speed up the process when I only need to update the assets is selecting the “Link Only” action, it won’t go through the whole compilation process but will still do the post-build steps.
Archlinux sidenote
By the way I use Arch3 There is currently a ready-to-use AUR
package available for Archlinux-based OSes, and you can still install a
proper compiler found in Debian’s stable repositories, it is safe to assume
you’ll probably get one in your distribution’s repositories. It makes the
installation process as easy as the Windows’ installer but I got a version of it
that had a small issue where two of the required binaries, pdc and pdutil,
weren’t properly packaged.
The package works well against arm-none-eabi-gcc but I currently have an issue
with missing system headers and I’m still digging for the solution.
A small project : a sphere
Among the small projects I like to have around is a “sketch” involving a spining sphere in a star field. The first version comes from an experiment where I’d build a 3D projection/rendering system from scratch in Pico-8. The first version was poorly designed and pretty slow but after a few years away, the latest version works pretty well as a base to start ports from it.
So, during a night where I was frustrated from not being able to program stuff quick enough, I started porting the sketch into C for the PlayDate. The “best” part was probably making the linear algebra routines I’d need (vector and matrices operations).
The sphere.
This project made me realize a mistake I have been doing since the Pico-8
version : I didn’t understand the Z was pointing to in the basis. The toolkit
uses an OpenGL/GLM inspired coordinate basis, so it’s a right handed coordinate
system where the Y component is pointing up, causing the positive Z coordinate
to go towards the camera, not away from (assuming the camera being at the zero
point). To be visible on the camera, a vertex should have a relative z component
in the range ]-far; -near[. The Pico-8 sketch has a broken depth boundaries
check especially because of this, the z projection doesn’t work behind the
camera, so with a positive Z coordinate (or at least higher than -near).
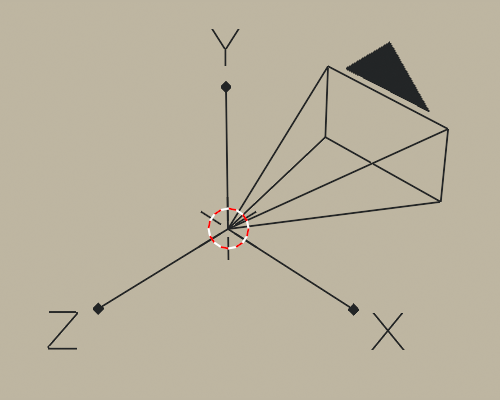
A Blender screenshot.
Note how the camera looks in the negative Z direction.
The project is open source and is considered in a finished state. You can also check the Playdate’s forum topic about this and download the binaries for you to run it. If I ever come back to it, it’ll probably with a newer version of the 3D engine, I don’t really intend to make any other improvements.
Fit a bull into a shoebox
In the end, it needed the same kind of optimizations than the Pico-8 sketch to work under the target 30 FPS, namely reducing at most the computations done per vertex and reducing the amount of draw calls to avoid overdraw.
First, because matrix operations are associative, an operation like
projection * translation * rotation * scale * vertex can be done in two steps:
(projection * translation * rotation * scale) * vertex and the first operation
can be precomputed to avoid having to do it per-vertex. It’s a classic
optimization but it really made a difference. Here’s an excerpt of the code to
show how it’s done in the final version.
static void init(void)
{
    // - snip -
    const mat3 rotx = m3_eulerx(C_PI * 0.1);
    const mat3 roty = m3_eulery(C_PI * 0.2);
    base_rotation = m3_mulm(roty, rotx);

    base_translation = m4_transl((vec3) { 0, 0, Z_OFFSET });

    proj = m4_persp_ndc(C_PI / 2.f, 400.f / 240.f, 0.1f, 100.f);
    // - snip -
}

static int update(void* userdata)
{
    // - snip -
    const mat3 rotz = m3_eulerz(-angle);
    const mat3 rot = m3_mulm(base_rotation, rotz);
    const mat4 rot4 = m4_fromm3(rot);

    const mat4 trs = m4_mulm(base_translation, rot4);
    // Sure, (proj * translation * Ry * Rx) could be precomputed
    // during init(), but it runs fast enough like this.
    const mat4 pipe = m4_mulm(proj, trs);

    // Project the sphere's vertices
    for (int i = 0; i < 92; ++i)
    {
        // Here too, the sphere vertices could be pre-multiplied.
        // Those are left as "easy" optimizations if needed.
        const vec4 v = v4_fromv3(v3_muls(sphere_vertices[i], SPHERE_R));
        const vec4 vp = m4_mulv(pipe, v);

        const vec3 vj = { vp.x / vp.w, vp.y / vp.w, vp.z / vp.w };

        projected_sphere_vertices[i] = (vec4){
            vj.x * 200.f + 200.f,
            vj.y * 120.f + 120.f,
            vj.z,
            vp.w,
        };
    }
    // - snip -
}
The original sketch’s data structure was composed of vertex and triangles, By drawing every triangle and its sides I ended up drawing 3 lines per “face”, doubling the draws when the edges were shared with another triangle. In this case, there wasn’t a side that wasn’t shared, so I got all the lines drawn twice. Oops. That was corrected by switching to store the mesh data as vertices and lines and just draw the wireframe directly. Mind your data and mind its structure! The screen being 1-bit, there wasn’t any fancy color involved like in the original sketch, so it worked out without an issue as the potential z-order issues would be invisible. Jackpot!
Extra On floating points and order of operations
Actually, due to how floating point types are designed in the IEEE 754 standard, grouping operations or re-order them might lead to slightly different results due to loss of precision. So there will be differences, but in my case I assumed they’d small enough.
Dreaming of raster effects
One day, I remembered Super Castlevania IV’s raster effects, specially the barrel projection in the stage 4-3 where the backgrounds looks like the interior of a spining cylinder. The technique is quite simple on the paper: imagine you can blit a slice of a bitmap with a scale and an offset, the meat of the effect resides in adding a cosine factor to the scale and offset and use that for every line of the screen while tweaking the values it until it looks cylinder-ish enough.
The core algorithm looks like this :
// Assuming that we're on a 400x240 screen.

const float PI = 3.141592653f;

float base_scale = 1.5f; // Arbitrary value
float scale_factor = 0.5f; // Arbitrary value

float offset_factor = 120;

void* some_bitmap;

// Magic✨
// If you know Pico-8, this would roughly work like tline.
void draw_slice(
    int screen_x, int scren_y, int screen_width,
    void* bitmap,
    int bitmap_x, int bitmap_y,
    int bitmap_width, int bitmap_height);

for(int y = 0; y < 240; ++y) {
    // Remap y into [0; PI[ so the resulting sine value will go from 0 to 1 to 0
    // again.
    float angle = (float)(y) / 240.f * PI;

    // The magic is here.
    float sine = sinf(angle);
    float scale = base_scale + scale_factor * sine;
    float offset = scale * sine;

    draw_slice(
        0, y, 400,
        some_bitmap,
        offset, y,
        (int)(400.f  * scale), 1);
}
It is a visual effect related to the SNES’ ever-so-famous Mode 7. In Super Castlevania, it’s a combination of using both Mode 7 and HDMA commands to feed the affine transformation matrix different values on a per-scanline basis.
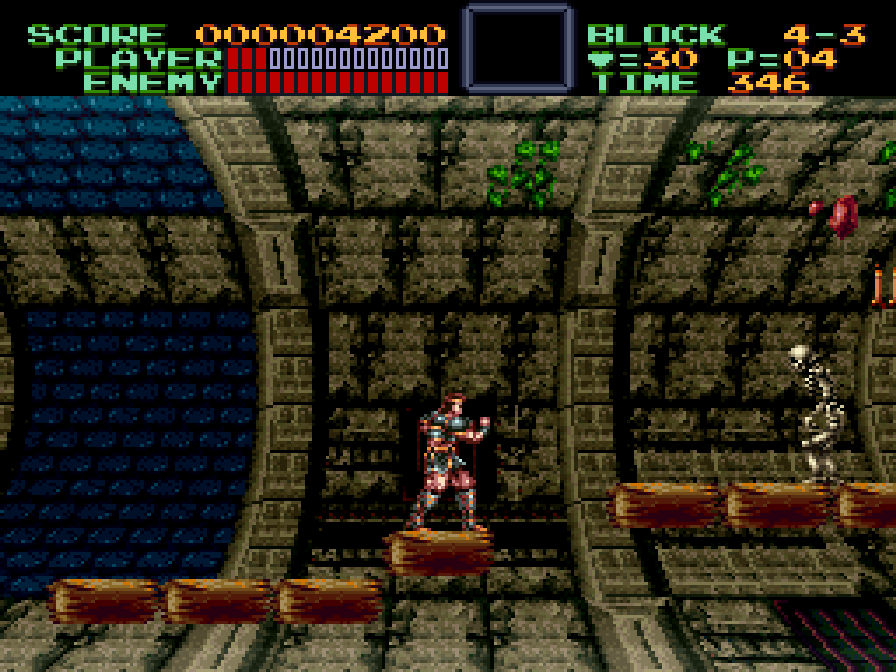
Super Castlevania - Level 4-3.
The famous barrel effect. Pardon the lack of GIF for this one.
On the Playdate? Everything’s done on the CPU, no access to fancy features like a PPU to offload the rendering or scanline interruptions. At the time I’m writing this blog post, the C API doesn’t even provide a quick way to draw a slice of a bitmap without resorting to clipping or sprites. So I rolled out my own routine. It works by accumulating 32 bits taken from a bitmap with the line’s scale/offset parameters applied at every iteration. The CPU being in a little-endian mode, it makes accessing the framebuffer’s bits a bit harder to do in more than just iterating through bytes.
For instance, let’s consider in one side a 16-bit short and on the other side, two bytes. Here’s the bit indexing order for both primitives:
I gave it a spin, I tried packing through 32-bit integers and swapping on the
fly the bytes before copying to the VRAM to make it work with a CPU opcode
(__builtin_bswap32 directly maps to REV16 on the Cortex-M7). I didn’t
measure the performance change, it was adding extra complexity in the code for
something that looked like a trivial change, but I’ll keep that in mind when
I’ll receive my unit. And behold!
The good old barrel effect.
Okay, that clearly wasn’t the first version. The first one didn’t handle the endiannes swapping and I had vaguely correct visuals but there was a weird effect where pack of columns of 8 pixels where mis-ordered!
In the end, I got a version running at 30FPS! It needed a few extra optimization steps. To make it run that fast, I had to tweak the innermost loop, the one that accumulates pixels and blit them to VRAM, to use fixed point math. Having hardware floating point support is nice but even if it’s magnitudes faster than software-based floating point operations, it’s still quite expensive. Operations like modulo are really expensive when applied to a whole screen, at least, for a puny device like the PlayDate.
Thus, changing the code to use 16.16 fixed point arithmetic gave me the edge I needed to fit the effect under the framerate budget. It’s even a bit overkill, the involved math is mostly about keeping track of the accumulator progression and it stays usually between 0 and 2 (it goes higher if the effect is scaled to high factors), so the whole 32-bit number isn’t really used, most of the time.
The moiré4 artifact in the gif caused by the intersection of the tunnel texture’s dithering and the screen/picture own grid. It might be funny to look at and I might like it, but it’s not that pretty though. Eh.
About those floats I owe ya…
Another note I’d like to point at is that the Cortex-M7 does have hardware support for floating point operations, but only single precision, not double; it has a SP FPU, Single Precision Floating Point Unit. This is written in the documentation but I think it’s good to have it here too.
In other words, float variables will be magnitudes faster than double
variables because they’re backed by hardware for a good subset of the arithmetic
operations while double aren’t. Recent versions of C allow you to do the
distinction between a double precision math function and its single precision
version: the single precision version usually have a f suffix. cos becomes
cosf, fabs becomes fabsf and so on. Like the SDK, I’ll suggest you to add
the warning -Wdouble-promotion to throw warning on implicit cast from floats
to double to avoid losing precious CPU cycles on that.
And even on the single precision side, there is something to be taken account of: like with every platform, for this kind of features, the compiler usually provide software routines for any operation the platform doesn’t support in hardware. If your CPU doesn’t have a FPU or more generally, if it requires software support for floating point, the compiler will bundle (or link to) a set of routines that will make up for implicitely, and while they might be extremely well programmed, they won’t be as fast as hardware support almost all the time.
The SH3 provided in my Casio calculators not having hardware float (GCC’s
-mhard-float architecture flag will make the generate FPU instructions), you
might understand better why I extensively used fixed point types on those. Thank
you Kristaba, this small library of yours did wonders.
How does the API look?
Note : this section has been added after publishing the post. Turns out I discussed about how to make those small projects while barely mentioning the API itself.
The minimal working program you could make for a PlayDate looks somewhat like that:
// This sample was spliced from the Hello World sample coming with the PlayDate
// SDK.
//
// The original sample's copyright notice:
//  Created by Dave Hayden on 7/30/14.
//  Copyright (c) 2014 Panic, Inc. All rights reserved.
//
// I mostly removed extra bits like the font loading and the DVD player
// screensaver part.


#include "pd_api.h"

static int update(void* userdata);

// The simulator build is actually a DLL loaded by the simulator. You have to at
// least export that function for the simulator to properly load your build.
#ifdef _WINDLL
__declspec(dllexport)
#endif
int eventHandler(PlaydateAPI* pd, PDSystemEvent event, uint32_t event_arg)
{
    (void)arg;

    if ( event == kEventInit )
    {
        // Note: If you set an update callback in the kEventInit handler, the
        // system assumes the game is pure C and doesn't run any Lua code in the
        // game
        //
        // setUpdateCallback registers the passed pointer, you could set
        // anything else but usually it's a good start to keep the access to the
        // API somewhere.
        //
        pd->system->setUpdateCallback(update, pd);
    }

    return 0;
}

static int update(void* userdata)
{
    // Left as is but is perfectly useless here.
    PlaydateAPI* pd = userdata;

    // Return 1 (or TRUE, I guess) to tell the OS that the callback operated
    // successfully and to continue the game loop.
    return 1;
}
The SDK is designed to work mainly with C, there’s no support for C++, no STL library or runtime features, you might be able to work out a freestanding build from scratch like with calculators, but here be dragons.
The C API felt kinda easy to use for most of my needs. For input, you either get
the input events coming from eventHandler or you can eventually request the
instant state of the buttons (the former being preferred to avoid missing input
changes). Getting the state of the crank is a matter of two function calls and
you can enable the accelerometer if you want to play with it.
I didn’t play much with sprites for those projects. They’re quite handy and kinda reminds me slightly of SmileBASIC’s own handling of sprites. The API has a sprite list system where you can assign draw state variables like a stenctil sprite, clipping rect and have basic physics to fulfill needs for games like platformers or top-down games, with collision filters and response.
// Some code from a paused and unannounced project
float next_x = player->x + (player->velocity_x * 1 / 30.f);
float next_y = player->y + (player->velocity_y * 1 / 30.f);

SpriteCollisionInfo *col_infos =
    pd->sprite->moveWithCollisions(
        player->sprite,
        next_x, next_y,
        &cx, &cy,
        &len);

float previous_x = player->x;
pd->sprite->getPosition(player->sprite, &player->x, &player->y);

player->velocity_x *= player->friction_x;
player->velocity_y *= player->friction_y;

// Collision response. You can have multiple collisions during the same
// movement, you *might* want to react to all of them if you don't want to miss
// critical things like hitting the ground.
bool hit_ground = false;
for (int i = 0; i < len; ++i)
{
    SpriteCollisionInfo *col_info = &col_infos[i];
    if (col_info->normal.y != 0.f)
    {
        player->velocity_y = 0.f;

        if (col_info->normal.y < 0.f)
        {
            hit_ground = true;
        }
    }
    if (col_info->normal.x != 0.f)
    {
        player->velocity_x = 0.f;
    }
}
On the lower-ended side of graphics, you can access the screen’s framebuffer if you feel like playing around with the VRAM. That’s how I rolled my low-level tline-like routine. For the people interested in it, it basically works like a linear 52x240 byte buffer, so with 2 extra bytes of padding, probably to keep the 32B alignment per row.
Regarding assets, the API has a build step to process some specific file formats to convert them into something easily digestible by the API, like bitmaps into sprite data, so that’s one production step you can sidestep by leveraging that pipeline.
I didn’t really understand how the API stored sprite bitmaps once converted. It looked like the sprite had two sprite bitmaps, one per layer, but I couldn’t exactly figure the layout when I was trying to pry the format open. They still are pretty easy to use:
LCDBitmap* bitmap;

// Tries to open the file `barrel.pdi` inside your program's .pdx folder.
bitmap = pd->graphics->loadBitmap("barrel", &err);

// Now, draw it!
pd->graphics->drawBitmap(bitmap, bmp_x, bmp_y, kBitmapUnflipped);
An interesting sidenote regarding optimization is that the API internally keeps track of the scren rows that were updated and will try to keep the smallest vertical range of screen to refresh when it needs to, so if you play with the VRAM, you have to mark which part of the screen you manually edited before requesting a flip.
On the practical side, I’d suggest pre-computing as many bitmaps as you can, the RAM is kinda cheap when it comes to 1b bitmaps (a pixel weights one bit, two if you have an alpha layer) and you have plenty of RAM to play around. That’ll cost you less CPU, which will be your bound if you’re graphics heavy.
Yeah, 16MB is a lot for the PlayDate, I’d say. 16MB is roughly 1344 screen buffers worth of memory, a far cry from calculators where you had something like 40kB of useable memory for a roughly less powerful CPU, right? You probably have less than 16MB as there’s an OS to run too, but if it can help you have a rough idea of the range you have, here’s that. Note that having sounds and musics will probably eat into this budget, but I haven’t touched that topic yet in my prototypes, so I can’t really tell what’ll happen.
And now, some last words and an exit(0);
So that was me playing around with the PlayDate. No game project (at least for this blog post), but small projects to guess and estimate how the API is designed and how I can make proper use of it. I should tap into the sound functions, there seem to be fun features like synth and MIDI playback.
An interesting side effect of the screen’s resolution and color depth is that whole you have a lot of space, to make readable graphics and “color”, you need to scale up your sprites more than if you scaled up a Pico-8 game up to the PlayDate’s resolution. That results in usually smaller game areas than I expected but I’m sure that’s largely manageable if you’ve got a skilled artist or drawing skills.
Don’t hesitate in adding outline to sprites. You don’t have a lot of colors to make a sprite stand out from the backgrounwithoutdy. You could also use dithering but beware of the swimming pixel effect when dithering is moving around, it can feel weird to look at.
If I go back to play around with the little yellow device, I’ll keep a draft for four or six months with a report some progress, I guess. Have a nice day!
Extra bits
Funnily enough, the checkerboard dithering pattern isn’t well appreciated by my desktop screen. It blinks quite a lot and I suppose it’s because it’s the pixel inversion pattern used by my screen.
Also, yes, the PlayDate runs Doom. Somebody ported Doom to the console, so I guess that’s another case checked off.
Update log
- 2022-11-03 - New section and corrections
- Changed mention of packages in Debian to precise that while there are no PlayDate package in Debian’s repositories, there’ll be enough to make it run on it.
- New section describing part of my experience with the SDK.
- New section on hardware floating point support and hard/soft floats.
-
I’m not counting the non-documented screen-mode that allows doubling the horizontal resolution by enabling the 800x240 pixel framebuffer mode without turning on stereoscopic 3D view. ↩︎
-
I’ll say I haven’t delved into retro-computing yet and I bet it shows. ↩︎
-
*Checks bingo case.* ↩︎
-
♩ When a pattern crosses another pattern, that’s a moiré. ♫ ↩︎